11/17/2017

Unbricking a Cyclades Terminal Server

Unbricking and Updating a Cyclades Terminal Server (TS)  After a Failed OS Flash


This is a formerly bricked Cyclades TS3000, just one of many models (TS400, TS800, TS1000, TS2000, and TS3000) of Terminal Servers originally sold by Cyclades  which was bought by Avocade, which was bought by Emerson Network Power,  who changed their name to Vertiv.  The last OS update was released in 2008 and it reached it's end of life years go,  they can be found for a few hundred dollars on eBay or various re-sellers.


They are a 1U piece of rack mount gear, the TS3000 has forty-eight (48) RJ-45 serial ports, one 10/100 Ethernet port, and a Console port.  Inside the box it is has a 48mhz PowerPC CPU,  128 megabytes of ram , and a 8 megabyte CF (compact flash) card.  It runs on an embedded Linux (TS-Linux), which is stored as an image on the CF card.

If the OS/Firmware image is no longer bootable, the device's documentation states that it will attempt to get an image (file name zvmppcts.bin) from a TFTP server, and provides a default addresses for which it send the request to (192.168.160.1).   BUT,  if the device has been configured the IP address it will send the default to or from could have been changed.  The boot loader/recovery software that makes the TFTP request is very limited, with just enough functionality to find and download the image.  This can make it difficult to unbrick the device in the event that it has been improperly updated.

This makes recovery of the device somewhat difficult but not impossible. Here is the process in which I was able to recover my Cyclades TS3000:

First, prepare the environment of the Cyclades TS and computer.

Run an Ethernet cable and console cable between the Cyclades TS and make sure the Cyclades TS is turned off.

On the computer,  disable or disconnect all network interfaces but the one connected tot he Cyclades TS.  Configure  the Ethernet port a static IP address, I suggest trying the default address it will send the TFTP get request to, 192.168.160.1 255.255.255.0

Next, three pieces of software will be needed.   A TFTP server, I used Pumpkin http://kin.klever.net/pumpkin ,  A packet capture software,  Wireshark  is probably the most widely uses https://www.wireshark.org/,  And A Terminal Emulator,  I used Putty http://www.putty.org/


After installing Pumpkin 1. Rename a copy of the OS image to zvmppcts.bin and place it into it's root directory.  2. Configure it to "give all files." 3. Start the server and leave it running/waiting for requests.


Install  and/or load Wireshark, start a capture for the port you plan on connecting to the Terminal server.


Open up Putty (or your terminal emulator of choice), and start a console connection session.

Once all the software is set up on the computer, turn on the Cyclades TS.  And watch the network traffic flow in Wireshark.

Wireshark capture of a successful ARP request, TFTP get request, and start of transfer. 

You should see an ARP request originating  the Cyclades TS's physical address. It will repeat a few times if not answered.   If answered it will send the request, and it is up to the TFTP server to send the file nor not. 

 In my experience  it asks for 192.168.160.1 (default IP that it will look for the TFTP server at) but wants the Mac Address of 192.168.160.1 to be told to 172.16.42.150.   172.16.42.150 is an address I gave the device some time ago.    Obviously,  a host with the address of 192.168.160.1 can't send a packet directly to 172.16.42.150, they are on completely different logical networks.  A host with 192.168.160.1 will send the response to it's default gateway.   The ARP request doesn't traverse Layer 3 gateways, nor does it seem like the Cyclades TS's boot loader/recovery rom have a default gateway or the ability to find one.

  If the request is for the IP address suggested above (the default address to request from) and the address that needs to be told about it are within the same network the TFTP transfer should start. Skip to the Next Step,


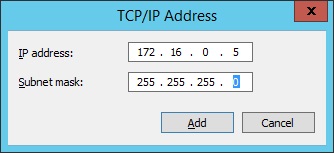
To fix this problem you will need to have two IP addresses on the interface, one to receive and the other to send.    Add the address the ARP request was looking for and another address with subnet mask that would place the "tell" address and your interface's second address on the same logical network.  For me the Tell address was 172.16.42.150, so I gave gave it a second address of 172.16.42.151 255.255.255.0.    Turn off and on the Cyclades TS to trigger the boot loader/recovery rom to attempt the TFTP transfer again


If addressed correctly your Cyclades TS should be able to request an OS image and the TFTP server should be able to send it.


After a successful do TFTP transfer, the Cyclades TS will reboot and should give similar is not identical output as above.

WARNING ! YOU ARE NOT DONE YET! The OS image is not saved in flash.


In your terminal window, login to terminal server.  If your previous password doesn't work, the default login for Cyclades TS-Linux is "root" and password is "tslinux"


Once logged in run "wiz" to configure the IP address to set an IP of your choice.


While optional, once the IP address has been configured you can access the the web based GUI through your favorite browser.

You still need to upload the image again to be saved into flash. You've still got the TFTP server up and running, there is no harm using it again.  This is easily done in the CLI  with the current  TFTP server.  Just make sure whatever IP you have given to the Cyclades TS it can communicate with the TFTP already configured.

use the following commands:
cd /proc/flash
tftp -l zImage -r zvmppcts.bin -g 192.168.160.1
md5sum zImage

The OS image needs to be named zImage and placed in the /proc/flash directory where the CF card seems to be mounted.  There shouldn't be any dialogue  for completing the TFTP transfer successfully, check your TFTP server's log if you want to be sure.   TFTP has no error correction,  compare the check sum of  the zImage file to make sure it got transferred intact.

After you are sure it was transferred correctly reboot the Cyclades TS,  it should reboot on it's own.

11/10/2017

Using a Windows Server as a Gateway

Segementing a Home Lab with a Windows Server despite having a Gateway Provided by the ISP .

Got a growing Home Lab and haven't isolated it from your Home Network?  Sounds like you you could benefit from segmenting it onto it's own stub network.  A  stub network is a network with only one path out who's gateway uses a default route traffic to the outside network.

Run of the mill example of a stub network 
Unfortunately,  many ISP's don't provide customers with gateway routers capable of (cough) advanced features like static routing and have made their networks incompatible with third party modems (looking at you AT&T Uverse.)

Unsegmented Home Network.

Even with a lack luster router from your ISP,  there are still two options to create a second network segment.

One,  if you install a second daisy chained to the ISP's provided router and place the second router on the DMZ.  But who really wants to run a Second Router for their home network?


Two, place your second network segment  behind a NAT (Network Address Translation) Gateway, which results in NAT behind NAT or double NAT.  This presents a greater problem.

The Problem  with NAT

NAT  as most people know it today is takes a private IP address and the gateway strips the source IP and Port number and replaces it with a shared public source address and a random and unique TCP or UDP port number. The gateway keeps track of and reverses the process when traffic returns, using the port number to match it back up with the original IP and original port number.   This implementation is what saved IPv4  at the dawn of the public Internet when host counts were exploding.  This allows one (public addresses) to many (private addresses).  It even adds an additional security feature in that it  but makes it all but impossible to initiate traffic flow to a host inside of the NAT gateway without assistance.

This will effect a home lab when placed behind a NAT gateway.  Hosts on the home network will not be able to  initiation communications with hosts in the lab network. Want to RDP or VNC into a server from your a laptop while you sit in a recliner or on patio?  Kodi box access a file? SSH into a terminal/console server?  It's not gonna happen from you are connected to the home gateway's WiFi with this type of NAT. 

History to the rescue.

NAT's original purpose was to allow a hosts on dissimilar networks the ability to communicate.  Private IPv4 address can't communicate across the the public network by design. So NAT was first developed to only  stripped off and replaced the source IP (Private) address and replace it with another IP address (public) .   The is called called "1 to 1",  reservations, or Static.  Today this is mostly used for public facing servers.  If you exchange private with "home lab" and public with "Home network", the protocol will still work AND still prevent the dreaded broadcast traffic from using up valuable network bandwidth and time.

Who really wants to have a third router?  Or even second router their network, using electricity and taking up space. Routers are just purpose built computers.  I'm not passing massive amounts of traffic between the networks, most of the the lab stays turned off when not in use.  The only system that runs 24/7 in my lab is a low power Windows Server System.  Windows Server (unlike Windows Desktop) is jam packed with features and abilities.

  While network people would say "ew" to the very thought of using a Windows Box as a router, But I like a good challenge and the idea of not paying to power one or two extra routers.

One becomes Two.
Note:  I am running Windows Server 2012r2 without Active directory.  If you are running another version and/or have a domain, your experience may vary.   This could also be accomplished with a Linux/Unix based OS, but that is a topic for a future post.

Here is how I did it:

Step 1 Get everything other than the server ready. 

Build the networks physically.  Each person's home and lab networks will be unique when it comes to the topology  and type of connection mediums,  just make sure your two segments aren't directly connected and both have Layer 2 connections to the server. 

During this step you should start some documentation,  write down a list of Lab Network Hosts  with  a IP from the list of excluded addresses.

The picture above is the logical topology to be built.  It needs two complete IPv4 networks each with it's own gateway address.  Here is a example of then network addressing:

"Home Network" - 192.168.1.0 255.255.255.0 (/24)  gateway 192.168.1.1
"Lab Network" - 172.16.0.0 255.255.255.0 (/24) gateway 172.16.0.1

Your home network probably is already in working order, and "if it ain't broke, don't fix it".   All you need to do is exclude a block of addresses from your Home Network's DHCP server' pool, to be used for translation.  For example a /24 network cut the Home Network Router's DHCP pool down to .2 through .191 so that.192 through .254 will not be assigned to hosts.  This will likely provide more than enough host addresses for your home and lab.

Next, Address your Lab Network's hosts.

The interface on your server/gateway connected to the Lab Network the first usable address,  to be used as the "Default Gateway" of all the hosts.  Again, not all hosts are the same.

Configure  address the rests of the hosts. With either:

1) Manually configure hosts with static IP address. Can be long and tedious if you have many hosts or change them often.

        2) Set up a DHCP server.  Windows Server has a DHCP service that can be installed, although beyond the scope of this guide.  A little extra work to setup but,  it can make life easier to manage your network's address centrally.

Document which hosts have been assigned which address,  you will need this when creating the NAT reservations later.

Step 2 Configure the Server's Interfaces.

Addressing the Server's interface connecting to the Home Network is the more complicated,  you will need to assign multiple  Home Network addresses to the Windows Server's interface connecting to the Home Network,  The Gateway needs to hold those IP addresses that will be Translated.


1)  Assign an IP address to the interface manually, give it a gateway and DNS server.
2)  Click the advanced button.

3)  Click the Add button and add each of the IP address you determined you needed.

4) Enter the IP address and Subnet mask one at a time.

Step 3 - Routing and Remote Access Server

Install the Remote Access (routing) Role on your Windows Server with Server Manager.  There are plenty of good guides and videos on how to install features if you are unfamiliar with this process.  Make sure that Routing and NAT are installed.


Once installed open the "Routing and Remote Access"  Console (found in the start menu), right click on your local server and click "Configure and Enable Routing and Remote Access".

Select "Custom Configuration" and click next.

Select NAT and LAN Routing. click next and finish the wizard.

Step 4 Configuring NAT

First adding the "Private Interface"


In the Routing and Remote Access Server (RRAS) management console right click on your server's IPv4_> NAT.    Right click and select New Interface.


Choose the Network Interface connected to the Lab Network.


Leave it as "Private" and click ok.


Add another New Interface for the interface connected to your Home Network and set it to "Public" and check the box to enable NAT.


Click on "Address Pool" TAB and then the "Add" button . A window should pop up to enter ll need to provide the Start Address, Mask, and End Address.   Note you can add all you want here, but unless the Interface has the IP address configured for the IP it will not be routed to it.


With the menu still open, click on "Reservations" and in the new window click "Add".


 Another window should pup up and to manually enter the Public and Private addresses for one reservation,  Make sure the "allow incoming sessions" option is checked.    Repeat for all Hosts on the Lab Network, the documentation suggested earlier will be real handy for this.

After everything is added, click ok to close the menus, NAT should be set up.

Step  5 Static Routing

The Gateway is now effectively a router,  but still needs a route.    A static "default" route will be needed to for the Lab Network Gateway to know the way out.


In the RRAS management console click on your server name, IPv4, and Static Routes. Right click and select "New Static Route"
A new window will open up,  select the interface on your Home Network, and enter the Destination of 0.0.0.0 , Network Mask of 0.0.0.0 , and for the Gateway the Address of your Home Network's. Leave the Metric at it's default value. Click OK to add the Route.

Step 6 - Test your new gateway.

Ping from a "Lab Network" host to IP's on your "Home Network"  and remote into one of your Lab Network's hosts from the Home Network.  If something doesn't work,  double check your addressing and NAT reservations in case there was an error.

Final note
Hosts on the Home Network should not be able to connect to IP  addresses held by hosts on the Lab Network, instead use the corresponding NAT reservation's "public" address.


Have fun - Steadman

11/08/2017

Welcome to Stubbed Home Lab

Welcome to Stubbed Home Lab,

Here I will document, ramble, and rave about what I done or will do with my own home network lab.

What is a home network lab?

It's is when a person is interested in learning and practicing working with protocols, software, and hardware.  There is no standard, definition, or requirements to call something a network lab.  It can be as simple as a collection of virtual machines on a computer or as complex with racks of servers, routers, and switches.  It is up to what you are interested in learning, your budget, and level of knowledge, to how and what you fill your lab.

What is in MY lab?

I started it while working towards a degree in data networking so I've got a stack of Cisco router and switches (it was CCNP level when bought), a console server, and a handful of  x86 computers for servers and hosts.


When and what will you post about?

  My goal is to post once a week or more about important or difficult things done in my lab soon after I do them.   I've got a back log of post ideas rolling around in my head already for guides, instructions, and configuration advice.

Debian/Ubunt Package Installation from Default Repositories.

Before you Begin Note: This is meant to be a building upon the previous posts with minimal repetition, the previous post has relevant info...